The best way to ensure consistent code quality and system stability is to integrate your application with a Continuous Integration system. Hudson is one such CI system.
In this tutorial, i will give a small demo on how to integrate Grails with Hudson. I will assume you are familiar with the grails technology and have some basic idea of what continuous integration systems are.
Note: This is not a tutorial on Hudson!
Step 1: Download and deploy hudson.war
Download hudson from the hudson home page. Deploy the war file in your favorite web-server. I am using tomcat for the purpose of this demo. Place hudson.war in the %tomcat_installation%/webapps folder.
Tip: You may want to set an environment variable HUDSON_HOME pointing to a location of your choice where all the hudson jobs, plugins, reports, and all configurations would be stored. By default, hudson places everything in the user's home directory.
Start the web-server and browse to the url : http://localhost:8080/hudson (assuming your server is running on 8080)
Step 2: Install plugins
On the panel on the left side, navigate to 'Hudson -> Manage Hudson -> Manage Plugins'
In the 'Available' tab, look for the following
 plugins, tick the checkboxes and install them.
1. Grails plugin
2. Groovy plugin
3. Email-ext plugin
4. Violations plugin (for static code analysis)
5. Cobertura plugin (for code coverage)
Restart the web-server after installations.
We will discuss why we need these plugins shortly.
Step 3: Configure Hudson
Navigate to 'Hudson -> Manage Hudson -> Configure System'.
Set up 'JDK' , 'Grails Builder'. i.e. set up the JAVA_HOME and GRAILS_HOME paths in Hudson to your local installations.
Step 4: Create and configure a new job for your Grails application
Navigate to 'Hudson -> New Job' and choose 'Build a free-style software project'.

 3. Build: Add a build step (choose 'Build with Grails').
Choose the grails installation you had setup in Step 3.
Next choose a target - such as 'compile'.
You can add multiple targets seperated by commans.
You can choose the port number, the work directory etc.
 Let's say you want to run both: 'grails clean' and 'grails compile' commands:
So your target should now look like: 'clean compile'
You can also setup the 'Post-build Actions' to generate
JUnit test reports, and send email notifications once the
build is done. Save the configuration. You're ready to go!
Click 'Hudson -> 'Project name' -> Build Now.
You can check the output of the build process by clicking on the link shown in the 'Build History' panel on the left. Then click 'Console Output'.
Step 5: Static code analysis
Grails has a plugin by CodeNarc for static code analysis. You will first need to install this plugin in your grails application using the command:
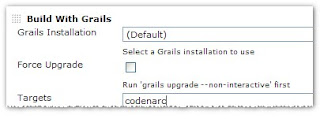 We would also need to add an additional build step in our job. Add the target 'codenarc' and save the configuration.
Also, in the the 'Post-build Actions' section, check the box agains 'Report Violations' and specify the name of the xml file as follows:
 Step 6: Publishing test results and code coverage results
For running tests, we would need to add a new target here 'test-app'. If you want to use code coverage as well. You first need to install the code-coverage plugin which can be done as follows:
Also, set up the code coverage report publication in the 'Post-build Actions' section. The code-coverage xmls can be found in the 'target/test-reports/cobertura/*.xml' folder.
That's all you need to do, and a build will be fired everytime there's a checkin, tests would be run, test reports would be published, code-coverage reports would be generated and code analysis reports would also be generated. Well, that's quite a bit for half-an-hour's effort :) Neat!
There's a lot of plugins available in Hudson that you can explore to suite your needs.
Hope you find this article useful.
Happy coding!
In this tutorial, i will give a small demo on how to integrate Grails with Hudson. I will assume you are familiar with the grails technology and have some basic idea of what continuous integration systems are.
Note: This is not a tutorial on Hudson!
Step 1: Download and deploy hudson.war
Download hudson from the hudson home page. Deploy the war file in your favorite web-server. I am using tomcat for the purpose of this demo. Place hudson.war in the %tomcat_installation%/webapps folder.
Tip: You may want to set an environment variable HUDSON_HOME pointing to a location of your choice where all the hudson jobs, plugins, reports, and all configurations would be stored. By default, hudson places everything in the user's home directory.
Start the web-server and browse to the url : http://localhost:8080/hudson (assuming your server is running on 8080)
Step 2: Install plugins
On the panel on the left side, navigate to 'Hudson -> Manage Hudson -> Manage Plugins'
In the 'Available' tab, look for the following
1. Grails plugin
2. Groovy plugin
3. Email-ext plugin
4. Violations plugin (for static code analysis)
5. Cobertura plugin (for code coverage)
Restart the web-server after installations.
We will discuss why we need these plugins shortly.
Step 3: Configure Hudson
Navigate to 'Hudson -> Manage Hudson -> Configure System'.
Set up 'JDK' , 'Grails Builder'. i.e. set up the JAVA_HOME and GRAILS_HOME paths in Hudson to your local installations.
Step 4: Create and configure a new job for your Grails application
Navigate to 'Hudson -> New Job' and choose 'Build a free-style software project'.
To configure the job Open the job, and click on 'Configure' on the left-hand-side panel.
1. Source code Management: Configure the source code. If you are using SVN or CVS, add the urls, credentials and ensure that the src code is available.
2. Build Triggers: You need to decide when you would want to run the builds against the src code. You have options such as 'Polling the SCM' which would keep polling the SCM and fire a build everytime there is a checkin ( you can also specify a cron expression to configure the polling frequency) or you could choose to build the project at regular periods. etc.
Choose the grails installation you had setup in Step 3.
Next choose a target - such as 'compile'.
You can add multiple targets seperated by commans.
You can choose the port number, the work directory etc.
 Let's say you want to run both: 'grails clean' and 'grails compile' commands:
So your target should now look like: 'clean compile'
You can also setup the 'Post-build Actions' to generate
JUnit test reports, and send email notifications once the
build is done. Save the configuration. You're ready to go!
Click 'Hudson -> 'Project name' -> Build Now.
You can check the output of the build process by clicking on the link shown in the 'Build History' panel on the left. Then click 'Console Output'.
Step 5: Static code analysis
Grails has a plugin by CodeNarc for static code analysis. You will first need to install this plugin in your grails application using the command:
grails install-plugin CodeNarcAnd add the following to the Config.groovy file, so that we can use the 'Violations' plugin in hudson to analyze the xml reports generated by this plugin.
codenarc {
reportName = 'CodeNarc.xml'
reportType = 'xml'
}
 We would also need to add an additional build step in our job. Add the target 'codenarc' and save the configuration.
Also, in the the 'Post-build Actions' section, check the box agains 'Report Violations' and specify the name of the xml file as follows:
For running tests, we would need to add a new target here 'test-app'. If you want to use code coverage as well. You first need to install the code-coverage plugin which can be done as follows:
grails install-plugin code-coverageThen set up a new build step and add "test-app -coverage -xml" -with the quotes- in the target field. ( if you don't want to run code-coverage just use 'test-app' as the target )
Also, set up the code coverage report publication in the 'Post-build Actions' section. The code-coverage xmls can be found in the 'target/test-reports/cobertura/*.xml' folder.
That's all you need to do, and a build will be fired everytime there's a checkin, tests would be run, test reports would be published, code-coverage reports would be generated and code analysis reports would also be generated. Well, that's quite a bit for half-an-hour's effort :) Neat!
There's a lot of plugins available in Hudson that you can explore to suite your needs.
Hope you find this article useful.
Happy coding!
Thanks a lot! This post was very helpful... :D
ReplyDelete